5. Tilemaps and text
A sprite per object stops scaling somewhere around a tunnel wall or a line of text. A tilemap draws a whole grid from one record.
Tilemaps
def build(self):
    world = self.layer("world", projection=vs2.TUNNEL)
    self.ground = world.tilemap("trench.png", columns=16, rows=16,
                                view_width=256, view_height=160)
The tileset is an ordinary strip: one frame per distinct tile.
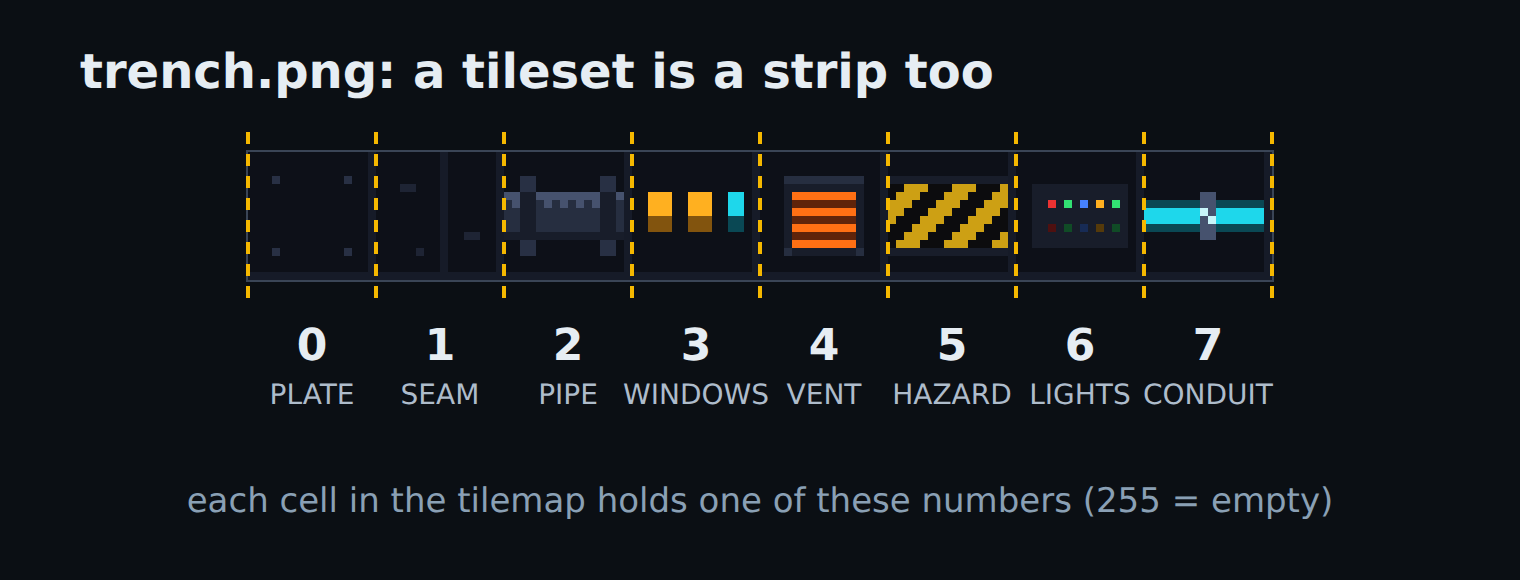
A tileset: tile 0 is a plain hull plate, 3 is a row of lit windows, and so on. Most of the tiles are near-black; the colour is in a few lit structures.
Tile size comes from the image, so it can never disagree with it —
tile_width and tile_height are
read-only.
The grid is made of cells, one byte each, holding a tile index:
self.ground[col, row] = WINDOWS        # (column, row) order
tile = self.ground[col, row]
self.ground.fill(PLATE)                # every cell
Dark or black backgrounds work better on the real Ventilastation, so draw a wall
in near-black tiles and keep the colour for a few lit structures, the way
trench.png does. (Always check your colours and intensities on the real
hardware; see Budgets and real hardware.)
vs2.EMPTY_TILE (255) leaves a cell blank and the renderer skips it.
Freshly allocated grids are filled with it, so a new tilemap starts out dark.
Here is a 16 by 16 map of the tiles above: a ring of pipe at the rim, a ring of
glowing conduit further in, and some windows, vents and lights between them, with
a ship on top. The map wraps all the way round the tunnel:
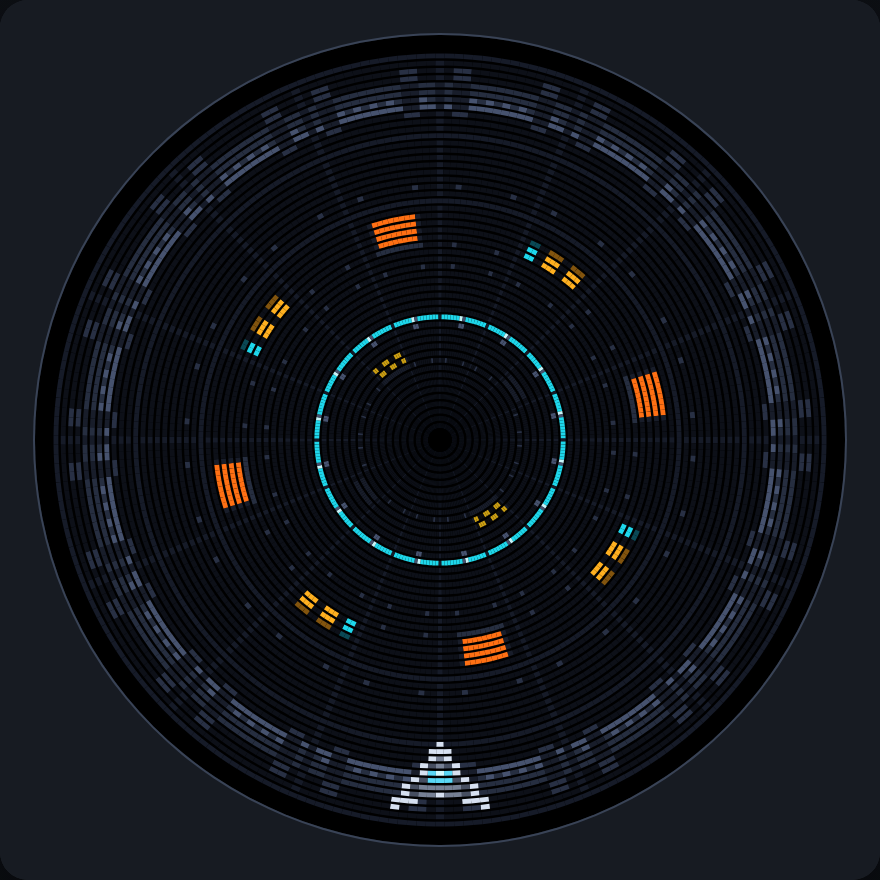
A 16 by 16 tilemap on a TUNNEL layer. Tiles near the rim are drawn larger.
Scrolling
The view is a fixed window onto the grid. Scrolling moves the window, not the data, so it costs one write:
def update(self):
    pattern_height = 6 * self.ground.tile_height     # the wall repeats every 6 rows
    self.scroll = (self.scroll + 0.75) % pattern_height   # self.scroll starts at 0
    self.ground.view_y = self.scroll
If the picture repeats every 6 rows, the view can wrap back to the top after 6 rows and nobody can tell: the wall scrolls forever without a single cell being rewritten. A map that does not repeat has to rewrite a row of cells each time a whole tile has scrolled past instead, which is still much cheaper than rewriting the grid every tick.
Labels
A label is a tilemap you write strings into. Three lines of text as sprites cost 54 of your 100 slots; as labels they cost one tilemap record each, no matter how often the text changes.
def build(self):
    hud = self.layer("hud", projection=vs2.HUD)
    self.score  = hud.label("numerals.png", columns=5, x=246, y=1)   # bottom of the disc: upright
    self.status = hud.label("tinyfont.png", columns=21, rows=3, x=-42, y=0)
    self.title  = hud.label("steel8x8.png", columns=18, text="READY")
One-line labels get a text property; multi-line ones use
write():
self.title.text = "GAME OVER"                # truncates and pads
self.status.write(0, 1, "J1:.... .... ..")   # (column, row, text)
You write ordinary left-to-right strings; the label handles the display’s direction for you. Which way up the text reads depends on where you put it, as the next section explains.
Scores without allocating
Formatting a number with "%05d" % value creates a new string every tick.
set_number() writes the digits straight into the cells
instead:
def update(self):
    self.score.set_number(self.points, width=5, pad="0")
Which way up? Flips
Glyphs are drawn with their tops pointing toward the centre of the disc. At the bottom of the disc the centre is above the text, so it reads upright. At the top the centre is below the text, so the same label is upside-down. On the sides it runs sideways.
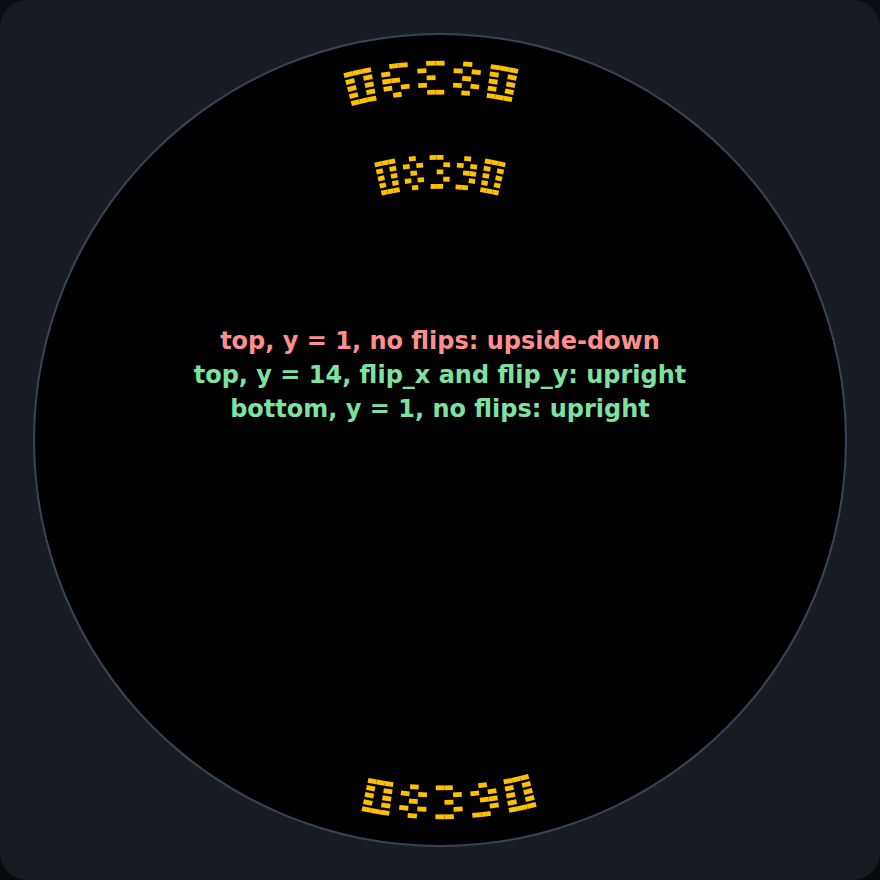
The same label in three places. Only the top one without flips is upside-down.
To read upright at the top, flip the label both ways:
self.top = hud.label("numerals.png", columns=5, x=118, y=14,
                     flip_x=True, flip_y=True)
flip_x mirrors the label left to right and flip_y mirrors it top to bottom.
Doing both turns it through 180 degrees, which is what you want at the top of
the disc. One flip on its own just gives you mirrored text.
Warning
Upside-down text at the top of the disc is the most common newcomer
mistake. Nothing is wrong with your string or your font. Add
flip_x=True, flip_y=True to the label. The scoreboards in the games under
games/ all do this. Sprites and tilemaps take the same two arguments.
A label with both flips, next to one with none, over a small map:
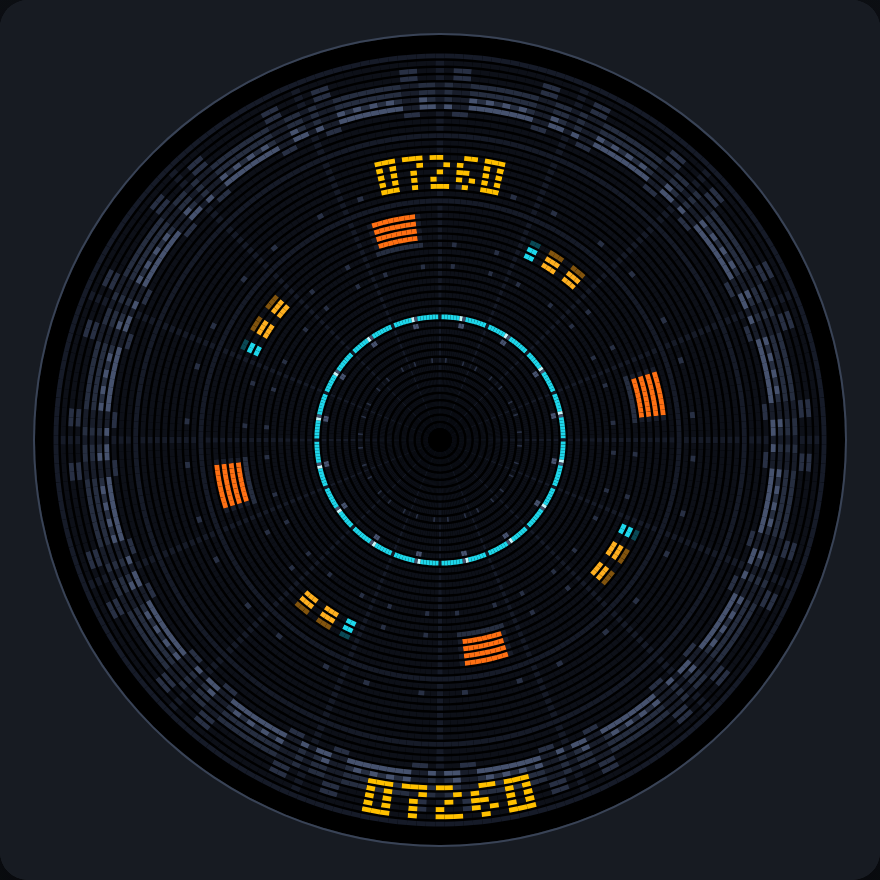
Two labels: one at the top with flip_x and flip_y, one at the bottom with no flips.
Glyphs
A label shows a character by picking the glyph frame for it. By default
that is CP437, where frame = ord(ch) — what steel8x8.png and the
other full font strips use. A strip with only a few characters, like a row of
digits, declares its own mapping in __images__.yaml, next to the strip:
- strip: numerals.png
  frames: 12
  glyphs: "0123456789 *"
Character n of the string is the glyph for frame n, so here frame 0 is 0,
frame 9 is 9, frame 10 is a space and frame 11 is a *. The frames: entry
is still needed; leave it out and the strip counts as one frame.
Characters with no mapping, and spaces, are left blank. Other ways to set the mapping, and strips with a second colour, are in going further.
Note
Labels count against the tilemap budget, not the sprite budget — 16 tilemaps including labels. A score, a message line and a debug overlay are three before any tilemap for the world.
In the game
Give Trench Run a trench to fly down, and a score.
Choosing a look
A trench run is a good excuse for a dark game, so pick a setting where dark is natural. Trench Run takes place in a derelict space station: you fly down a maintenance trench between plates of dead, near-black hull, dodging the station’s enemies. The station has no power to spare, so the only colour is in the few things that are still lit:
cyan conduit running round the trench in a bright ring;
amber windows and orange vents, in warm contrast to the cold blue-grey plating;
red, green and blue status lights and yellow hazard stripes, as small accents;
a ring of steel pipe at the rim, a little lighter than the hull, so the edge of the wall is easy to find.
This is a setting rather than only a palette because it gives a reason for every
tile you draw, and it answers the question “what goes here?” the same way each
time: if nothing is lit, leave it dark. That is also what suits the real
Ventilastation. The LEDs make their own light, so a black or near-black
background costs nothing and makes the lit structures stand out, where a bright
backdrop would wash them out and tire the eye. The plating in trench.png is
only a few steps above black, and the structures on it are bright.
Note
The emulator shows you what the colours are, not how the LEDs will render them. The very dark tones in particular, such as the plating and its seams, may crush to black or look different on the disc. Treat them as a starting point and check them on the real hardware (see Budgets and real hardware), raising the darkest tones if the detail is lost.
trench.png is the tileset you saw above, and the wall repeats every six rows,
which is what lets it scroll forever.
A second layer holds the score, so it is drawn over everything in the world. The wall goes into the world layer before the ship, so the ship is painted over it:
# The trench's tiles, in the order they appear in trench.png.
PLATE, SEAM, PIPE, WINDOWS, VENT, HAZARD, LIGHTS, CONDUIT = range(8)
TRENCH_COLUMNS = 16  # around the tunnel
TRENCH_ROWS = 16     # along it
PATTERN_ROWS = 6     # the wall repeats every 6 rows, so it can scroll forever


def trench_tile(col, band):
    """Which tile goes at ``col`` in row ``band`` of the repeating pattern."""
    if band == 0:
        return PIPE
    if band == 4:
        return CONDUIT
    if band == 2:
        if col % 4 == 1:
            return WINDOWS
        if col % 4 == 3:
            return VENT
    if band == 5:
        if col % 8 == 2:
            return LIGHTS
        if col % 8 == 6:
            return HAZARD
    return SEAM if col % 2 else PLATE


def build(self):
    self.world = self.layer("world", projection=vs2.TUNNEL)
    self.hud = self.layer("hud", projection=vs2.HUD)

    # The trench wall: dark plating all the way round, with a few lit
    # structures. Its pattern repeats every PATTERN_ROWS rows.
    self.ground = self.world.tilemap(
        "trench.png", columns=TRENCH_COLUMNS, rows=TRENCH_ROWS,
        view_width=256, view_height=160)
    self.draw_trench()

    self.ship = self.world.sprite("ship.png", y=0)
    self.ship.x = -(self.ship.width // 2)
    # ... the pools, as before ...

    # Top of the disc, where x = 128, so the score is flipped to read upright.
    self.score_label = self.hud.label("numerals.png", columns=5, x=118, y=1,
                                      flip_x=True, flip_y=True)

    self.score = 0
    self.scroll = 0                     # how far the wall has scrolled
    self.ticks = 0                      # as in chapter 4
    self.show_score()

def draw_trench(self):
    for row in range(TRENCH_ROWS):
        for col in range(TRENCH_COLUMNS):
            self.ground[col, row] = trench_tile(col, row % PATTERN_ROWS)

def show_score(self):
    self.score_label.set_number(self.score, width=5, pad="0")
Why view_width=256, view_height=160? The view is the window onto the map,
and it works in pixels. The map is 16 columns of 16-pixel tiles, so 256 pixels
wide, which is exactly the 256 columns around the disc: the whole circle is
visible. It is also 16 rows of 16 pixels, 256 pixels tall, but the view shows only
160 of them. The wall repeats every 6 rows, which is 96 pixels, so view_y only
ever needs to run from 0 to 95 before it wraps. Then the window, at its lowest
position, covers pixels 95 to 254, still inside the 256 pixels of the map; a view
up to 161 pixels tall would fit, and 160 is the round number below that. If you
use another map, work it out the same way: take the repeat length in pixels, and
make sure the map is at least that much taller than the view.
Scroll the wall toward the ship in update(), right after the steering:
SPEED = 0.75         # depth units per tick: how fast the wall scrolls and enemies come

    # Scroll the wall toward the ship. After one whole pattern the picture
    # is the same again, so the view can wrap without rewriting any cells.
    pattern_height = PATTERN_ROWS * self.ground.tile_height
    self.scroll = (self.scroll + SPEED) % pattern_height
    self.ground.view_y = self.scroll
The wall moves at SPEED, the same number the enemies use, because the enemies
are part of the trench: they come at you exactly as fast as the wall goes by.
view_y takes whole pixels, so it ignores the fraction, while self.scroll keeps
it, which is how the wall can scroll at three quarters of a pixel a tick.
Score points for every enemy that gets past the ship, in move_enemies():
POINTS = 10

def move_enemies(self):
    for enemy in self.enemies:
        # ... moving and animating, as before ...
        if enemy.y < -enemy.image.height:
            self.enemies.despawn(enemy)      # flew past the ship
            self.score += POINTS
            self.show_score()
numerals.png declares its own glyphs in __images__.yaml, as in the glyphs
section above, so set_number() knows which frame is which digit. The score sits
at the top of the disc, centred on x = 128 (the label is 20 columns wide, so
x = 118), and the ship at the bottom. The score is flipped both ways, exactly as
in the section above, so that it reads upright:
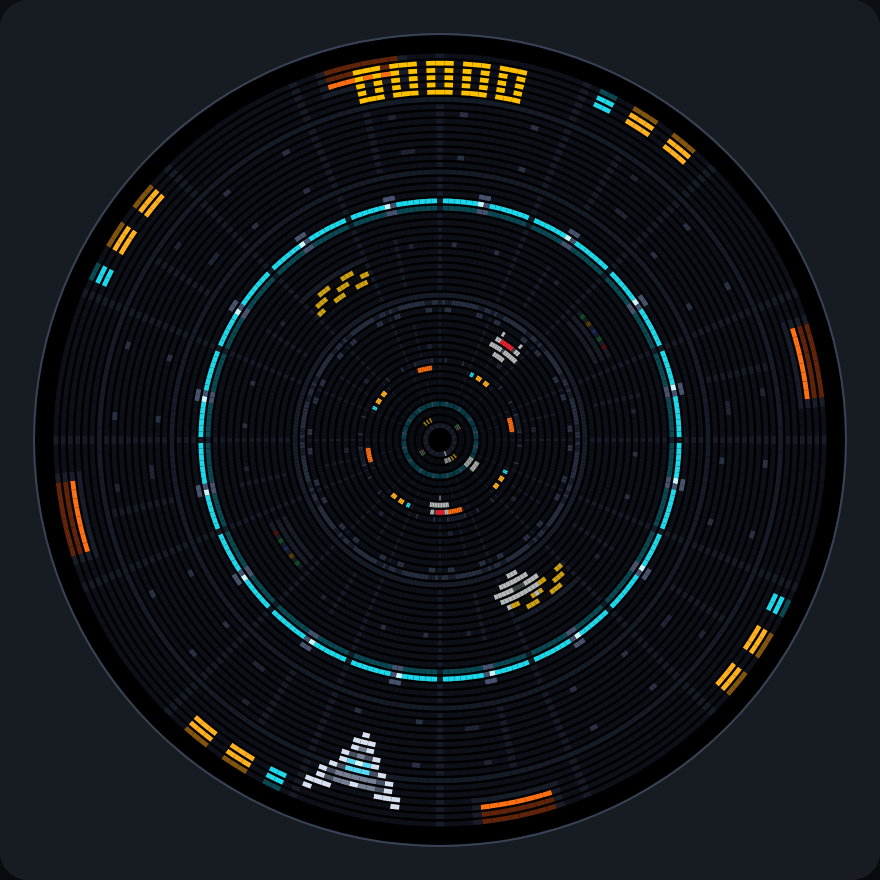
Trench Run so far.
The file so far
Everything from this chapter in one file, as it stands after chapter 5. If yours misbehaves, compare it
with this one. It is docs/vs2/tutorial/steps/step5_tilemaps.py in the repository.
# Trench Run, chapter 5: a trench to fly down, and a score.
import vs2
from vs2.controls import *

LEVEL, TURN_LEFT, TURN_RIGHT = range(3)      # the frames of ship.png
SPEED = 0.75         # depth units per tick: how fast the wall scrolls and enemies come
ENEMY_START = 160    # depth at which enemies appear
POINTS = 10

# The trench's tiles, in the order they appear in trench.png.
PLATE, SEAM, PIPE, WINDOWS, VENT, HAZARD, LIGHTS, CONDUIT = range(8)
TRENCH_COLUMNS = 16  # around the tunnel
TRENCH_ROWS = 16     # along it
PATTERN_ROWS = 6     # the wall repeats every 6 rows, so it can scroll forever


def trench_tile(col, band):
    """Which tile goes at ``col`` in row ``band`` of the repeating pattern."""
    if band == 0:
        return PIPE
    if band == 4:
        return CONDUIT
    if band == 2:
        if col % 4 == 1:
            return WINDOWS
        if col % 4 == 3:
            return VENT
    if band == 5:
        if col % 8 == 2:
            return LIGHTS
        if col % 8 == 6:
            return HAZARD
    return SEAM if col % 2 else PLATE


class Game(vs2.Scene):
    def build(self):
        self.world = self.layer("world", projection=vs2.TUNNEL)
        self.hud = self.layer("hud", projection=vs2.HUD)

        # The trench wall: dark plating all the way round, with a few lit
        # structures. Its pattern repeats every PATTERN_ROWS rows.
        self.ground = self.world.tilemap(
            "trench.png", columns=TRENCH_COLUMNS, rows=TRENCH_ROWS,
            view_width=256, view_height=160)
        self.draw_trench()

        self.ship = self.world.sprite("ship.png", y=0)
        self.ship.x = -(self.ship.width // 2)     # centred on x = 0, the bottom of the disc
        self.enemies = self.world.sprite_pool("enemy.png", count=16)
        for i in range(5):
            self.enemies.spawn(x=i * 51, y=ENEMY_START)

        # Top of the disc, where x = 128. Text up there is upside-down unless it
        # is flipped both ways.
        self.score_label = self.hud.label("numerals.png", columns=5, x=118, y=1,
                                          flip_x=True, flip_y=True)

        self.score = 0
        self.scroll = 0                 # how far the wall has scrolled
        self.ticks = 0
        self.show_score()

    def draw_trench(self):
        for row in range(TRENCH_ROWS):
            for col in range(TRENCH_COLUMNS):
                self.ground[col, row] = trench_tile(col, row % PATTERN_ROWS)

    def show_score(self):
        self.score_label.set_number(self.score, width=5, pad="0")

    def update(self):
        self.ticks += 1

        # +1 for left, -1 for right, 0 for neither (or both held: they cancel).
        # At the bottom of the disc x counts up toward the left.
        steer = joy1.held(LEFT) - joy1.held(RIGHT)
        self.ship.x = (self.ship.x + steer) % vs2.display.width
        if steer > 0:
            self.ship.frame = TURN_LEFT
        elif steer < 0:
            self.ship.frame = TURN_RIGHT
        else:
            self.ship.frame = LEVEL

        # Scroll the wall toward the ship. After one whole pattern the picture
        # is the same again, so the view can wrap without rewriting any cells.
        pattern_height = PATTERN_ROWS * self.ground.tile_height
        self.scroll = (self.scroll + SPEED) % pattern_height
        self.ground.view_y = self.scroll

        self.move_enemies()

    def move_enemies(self):
        for enemy in self.enemies:
            enemy.y -= SPEED
            enemy.frame = (self.ticks // 6) % enemy.image.frames
            if enemy.y < -enemy.image.height:
                self.enemies.despawn(enemy)      # flew past the ship
                self.score += POINTS
                self.show_score()


def main():
    return Game()
Next: scenes, input and sound.